English
  中文简体
中文简体  Español
Industry News

2025-11-11
A compromised weather stripping seal can lead to a host of problems that affect your driving comfort and the interior integrity of your vehicle. One of the most common indicators of a failing seal is the noticeable increase in road noise, particularly at higher speeds, where wind whistling becomes prominent. Water leakage during rainstorms or car washes is a more severe sign, often leading to damp carpets, mold growth, and potential electrical issues. Another clear signal is the presence of drafts inside the cabin, making it difficult for the heating or air conditioning system to maintain a consistent temperature. Additionally, visible signs of wear such as cracks, tears, brittleness, or a permanent deformation of the rubber material are clear visual cues that a replacement is necessary. You should meticulously inspect the seals around the windshield, doors, sunroof, and trunk or hatchback, as these are the areas most exposed to the elements and mechanical stress.
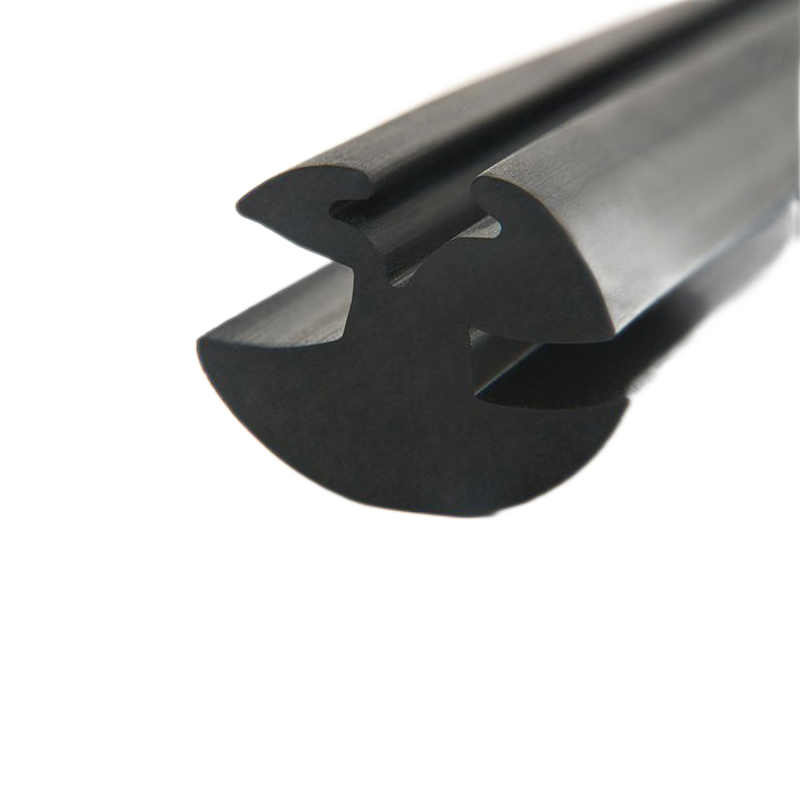
Choosing the appropriate T-shaped weather stripping is a critical step for a successful installation that ensures long-term performance. The primary consideration is the material; you should look for a high-quality, durable rubber that is specifically designed to be waterproof, UV-resistant, and capable of withstanding extreme temperature fluctuations without losing its elasticity. The T-shaped design is particularly effective for channel-based applications, such as window channels and certain sunroof and windshield trim installations, where it needs to be securely gripped by the metal or glass flange. Accurate measurement of the channel where the new seal will be installed is paramount; using a soft measuring tape, carefully measure the entire length that requires replacement, and it is always a prudent practice to purchase a little extra length to account for any measurement errors or cutting mishaps. The self-adhesive backing is another vital feature, as a strong, reliable adhesive is essential for creating a permanent, watertight bond with the vehicle's body.
Proper preparation of both the vehicle and the new sealing material will significantly influence the quality and durability of the installation. Begin by thoroughly cleaning the old channel where the new T-shape seal will sit; use a strong degreaser or rubbing alcohol to remove all traces of old adhesive, dirt, wax, and grime, ensuring the surface is completely clean, dry, and smooth. Before making any cuts to the new rubber seal, dry-fit it into the channel to confirm your measurements are correct. When it comes to cutting the T-shaped trim, precision is key; using a sharp utility knife or a pair of fine scissors, make clean, straight cuts. It is often recommended to cut the seal at a 45-degree angle at the corners, as this creates a much cleaner and more professional-looking joint that helps prevent gaps. Taking your time during this preparatory phase will prevent common issues such as the seal being too short or having uneven, gap-prone ends.
With the surface prepared and the new seal cut to the exact required length, you can proceed with the installation process. Begin by peeling back a small section of the protective liner from the self-adhesive tape, typically just about a foot to start. Carefully align the T-shaped part of the seal into the channel, starting from one end, and press it firmly into place. As you work your way along the channel, slowly and gradually peel away more of the backing liner, continuously pressing the seal into position. Applying firm, even pressure along the entire length of the seal is crucial for activating the adhesive and ensuring a strong bond. Pay special attention to corners and curves, working the material gently to fit the contour without stretching it, as stretching can cause the seal to retract and create gaps over time. Once the entire strip is installed, go over it once more with significant pressure, using a roller tool or your fingers, to confirm that every section is securely adhered.
After the installation is complete, it is essential to perform a few checks to verify the seal's effectiveness. Close the door, sunroof, or trunk lid gently to ensure it seats properly against the new weather stripping without excessive force. A simple water test using a garden hose can help you confirm there are no immediate leaks; spray water moderately over the sealed area and check the interior for any moisture. For the long-term health of your new weather stripping, periodic maintenance is recommended. You should regularly clean the rubber with a mild soap and water solution to remove dirt and debris that could accelerate wear. Applying a protectant specifically designed for rubber or vinyl can help keep the material pliable, prevent it from drying out and cracking, and protect it from UV damage, thereby extending its service life significantly and maintaining its sealing properties.
Contact Us
Copyright ©
Jiaxing Tosun Rubber&Plastic Co., Ltd.
All Rights Reserved.
Custom Rubber And Plastics Products Factory